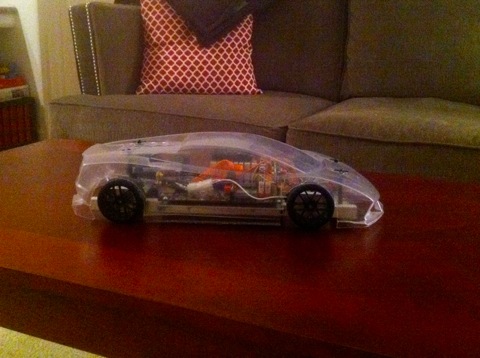
Yes, I know I am not the first to do this and it’s probably not the best, but it was fun and now I have a Lamborghini Gallardo in my living room! Listed below is a short show and tell of what I did to get a computer inside of a plastic car body.
The Look
I had already visited the hobby store and picked out the important items I needed. I ended up with a Lamborghini Gallardo car body and a set of wheels and tires that I thought would look good with it. After the all important decision of what this thing would look like the next part was to figure out how it would all fit inside of the Lamborghini body.
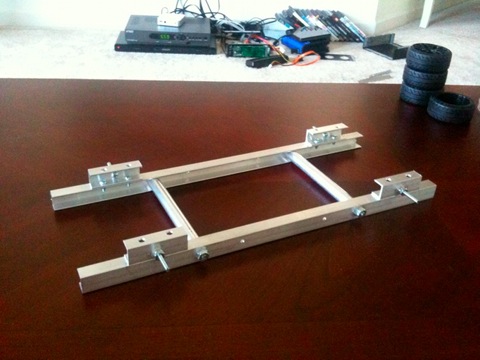
The Chassis
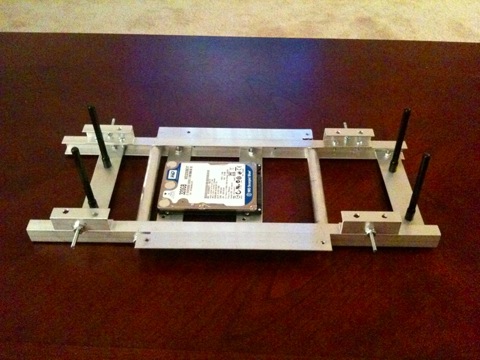
The first step in constructing a computer in a car was to build the chassis for it. Like most projects of mine I made a visit to the local hardware store to see what kind of material they had that I could make the chassis out of. I wanted to make it a little realistic looking so I decided to make it out of aluminum c-channels. The unfortunate thing for my neighbors is that I made all of the cuts with a dull hacksaw blade. For the first time in my life I believe I was actually louder than their barking dog!
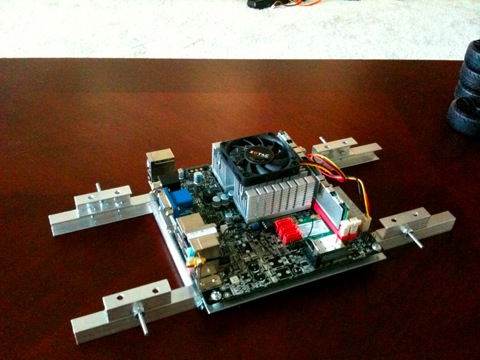
The Fit
After I scared off all prospective tenants from living in my apartment complex with the noise of my saw blade the next step was to mount the mother board to the newly built chassis. Success, it fit!!
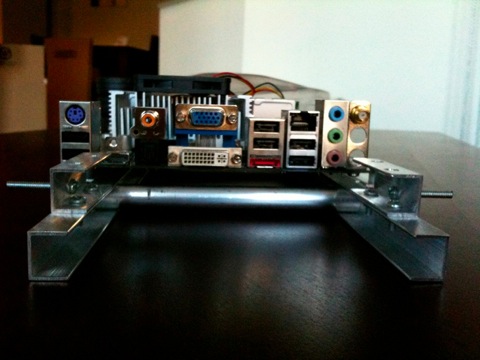
The Accessories
The only thing left to do ..or so I thought.. was to put on the wheels and attach the body mounts.

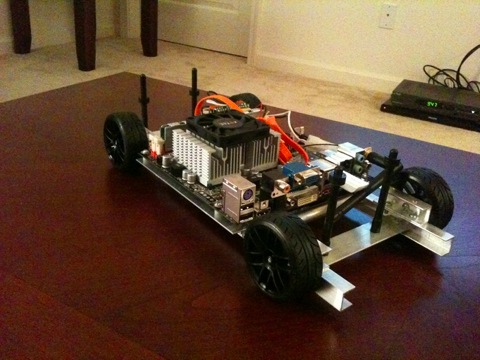
The Mistake
Of course I get everything put together and look at the pile of parts I have left over and conveniently in the middle of the pile of small bolts and pieces of aluminum I see a hard drive. This of course is a bit of an issue because I thought I was finished! So I picked up the hard drive and put it in about every position possible on top of the motherboard and could not find a place to put it. I ended up mounting it below the motherboard, visible but at least a little protected by the two aluminum strips used to hold it in place.
The Result
Clearly, it still needs some paint and (if I get really ambition) the rear spoiler and probably some LEDs that get remote turned on and off by my iPhone... but we'll save that for another chapter!
The Parts List
- Motherboard: ZOTAC ION-ITX 330
- Memory: PNY Optima 2GB
- Hard drive: Western Digital 320GB Scorpio
- Power supply: picoPSU-160-XT
- Car Body: Tamiya 1/10 Scale Lamborghini Gallardo LP 560-4 Super Trofeo
- Wheels: HPI Racing Split 6 26mm
- Tires: HPI Racing Super Drift 26mm radial